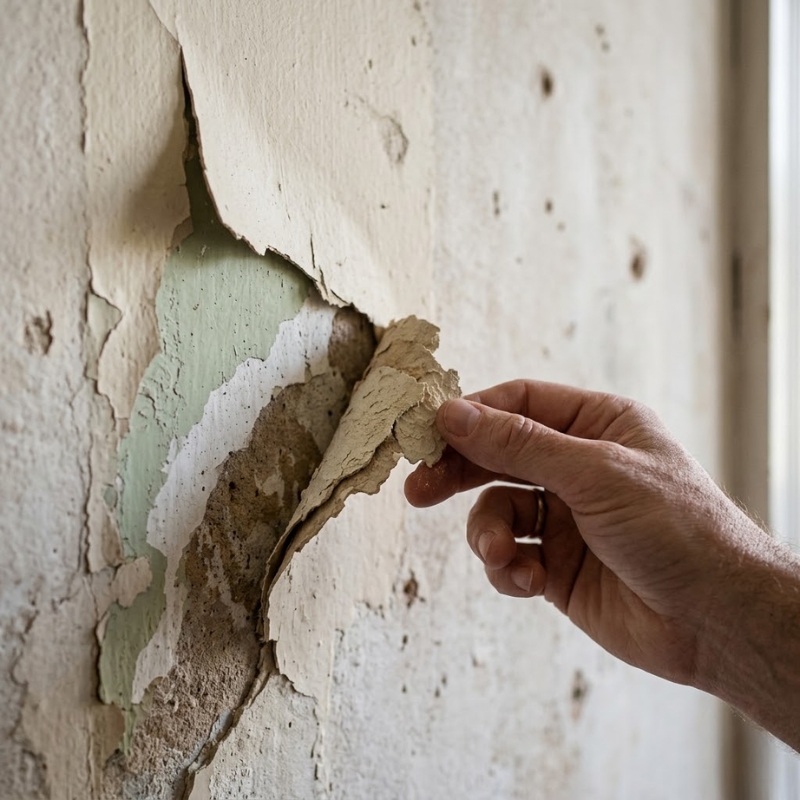
If you’ve ever peeled away a loose flap of paint and watched half the wall come with it, you’ve already learned the hard truth: paint doesn’t fail randomly. Peeling is nearly always a sign that the paint never bonded properly to what’s underneath, or that something later broke that bond (most often, moisture).
Sydney homes have a few local “usual suspects” that make peeling more common than people expect:
• Humid summers (especially near the coast) that load walls with moisture
• Cooler winter nights that drive condensation on cold surfaces
• Bathrooms and laundries that run hot and steamy (often with underpowered exhaust)
• Older walls that have been repainted multiple times, sometimes over glossy enamel or chalky surfaces
• Quick patch-and-paint jobs that skip sealing/priming
The good news: once you understand the cause, you can fix peeling paint in a way that actually lasts.
What peeling paint is really telling you
Peeling paint is an adhesion failure. That sounds technical, but it’s simple:
• The surface was dusty, greasy, glossy, powdery, damp, or unstable
• The wrong primer/undercoat was used (or none was used)
• The topcoat was incompatible with the layer beneath
• Moisture moved through the wall or sat behind the paint film
• The paint dried too fast/too slow for the conditions and didn’t form a strong bond
Think of paint like tape: it sticks best to a clean, dry, slightly textured, stable surface. If any one of those is missing, peeling is on the menu.
Peeling vs flaking vs bubbling (and why it matters)
These terms get used interchangeably, but they hint at different causes:
• Peeling: paint lifts in sheets or strips; often poor prep, glossy substrates, or moisture behind the film
• Flaking: small chips or scales; can be ageing, UV exposure (exteriors), or brittle layers
• Bubbling/blistering: raised bubbles; commonly moisture, heat, or painting over damp surfaces
You don’t need a lab to diagnose it — you need a few smart checks.
A Sydney homeowner’s quick diagnosis checklist
Before you scrape anything, do these quick checks so you don’t “repair” it only to watch it peel again.
1) Is there moisture involved?
Moisture is the biggest repeat offender in Sydney homes.
Look for:
• Damp patches, staining, or tide marks
• Musty smell, mould spotting, or persistent condensation
• Peeling concentrated near windows, ceilings, cornices, or external-facing walls
• Peeling that worsens after rain or after steamy showers
• Paint that feels soft or rubbery underneath
If mould is present, treat it seriously. NSW Health provides practical guidance on mould risks and safe cleanup steps that are worth following before undertaking any repainting. (NSW Health mould guidance)
2) Is the surface chalky or powdery?
Run your hand over the wall. If you get a fine powder on your fingers, the surface may be chalking (common on old paint or weathered surfaces). Paint won’t stick to powder.
A quick test: wipe a spot with a damp cloth. If colour rubs off easily and leaves powder, you’ll need to stabilise it (often with the right sealer) before repainting.
3) Is the old paint glossy?
Glossy enamels (common in older trims, kitchens, bathrooms) are durable — and notoriously hard for new paint to stick to unless they’re properly de-glossed and primed.
A quick test: shine a torch at an angle. If it reflects like a mirror, assume it needs de-glossing + bonding primer.
4) Is the peeling happening over patches or new plaster?
Fresh plaster, filler, or skim coats are thirsty. If they weren’t sealed properly, the paint can dry unevenly, bond poorly, or flash (patchy sheen). Sometimes the paint sticks to the patch but not to the surrounding old surface (or vice versa).
5) Is it isolated or widespread?
- Isolated areas (one corner, under one window): often a local moisture source or a patch/paint compatibility issue
• Widespread peeling (multiple rooms or whole ceiling): often systemic moisture/ventilation problems, major prep failure, or multiple incompatible layers
The most common causes of peeling paint in Sydney homes
Moisture from bathrooms, laundries, and kitchens
Sydney’s humidity plus steamy rooms equals a perfect storm. Bathrooms in particular fail when:
• Exhaust fans are undersized, dirty, or venting into the roof cavity
• Showers run hot with the door closed and little airflow
• Ceilings are painted with standard wall paint instead of a moisture-resistant system
• Grout or silicone fails, and water migrates behind walls
Peeling in bathrooms often starts at:
• The ceiling above the shower
• Corners where air is stagnant
• Around exhaust fan cut-outs
• Behind towel rails (condensation + poor airflow)
Prevention that actually helps:
• Run the exhaust fan during showers and for 15–20 minutes after
• Keep doors/windows open when practical
• Fix grout/silicone leaks early
• Use the correct bathroom-rated coating system when repainting
Condensation in winter (yes, Sydney gets it)
When outside temperatures drop overnight, internal moisture from breathing, cooking, drying clothes, and showers condenses on cooler surfaces. This is common in:
• South-facing rooms (less sun)
• Older homes with limited insulation
• Rooms with heavy curtains and closed windows
• Bedrooms where windows stay shut all winter
Condensation-driven peeling often shows up as recurring spots near windows, on external-facing corners, or on ceilings in poorly ventilated rooms.
Rising damp or subfloor moisture
If you see peeling and salt-like deposits near the bottom of walls, especially on older brick or masonry, rising damp may be involved. Paint is not the solution here — it’s the victim.
Signs include:
• Peeling up to about knee height
• Efflorescence (white, salty powder)
• Persistent damp smell
• Skirting boards swelling or staining
This is a “stop and investigate” scenario.
Roof leaks, gutters, and hidden water paths
Sydney storms can expose small roof or gutter issues that only show inside later. Peeling on ceilings or upper walls can be driven by:
• Roof leaks around flashing or valleys
• Blocked gutters causing overflow into eaves
• Downpipes discharging too close to walls
• Cracked render allowing water ingress
If the stain changes after rain, fix the water source first — always.
Poor surface prep (the silent killer)
Many peeling jobs come down to one thing: the wall wasn’t properly cleaned and keyed.
Common prep misses:
• Painting over dust from sanding or construction
• Painting over kitchen grease or fingerprints
• Not washing down chalky exteriors
• Not removing loose/failed paint fully
• Not feather-sanding the edge of sound paint
• Skipping primer on bare patches or repaired areas
If you want a practical baseline to work from, this is where a simple, repeatable approach to paint surface preparation matters more than brand names.
Incompatible coatings (water-based vs enamel problems)
A classic failure: painting water-based acrylic straight over glossy enamel without proper de-glossing and a bonding primer. It might look fine for a week, then start lifting.
Clues you’re dealing with incompatibility:
• Peeling happens in clean, dry areas
• The paint lifts cleanly, almost like a film
• You can sometimes peel it off in large sheets
• The layer beneath is shiny and hard
Painting over damp or too soon after repairs
Sydney’s humid days can slow drying. Painting while a wall is still damp (from leaks, washing, or fresh plaster) traps moisture. Later, as moisture tries to escape, it pushes the paint off.
Rule of thumb: if you’re not sure a wall is dry, don’t guess.
How to fix peeling paint properly (so it doesn’t come back)
There’s a reliable order that works across most situations:
- Remove failed paint
- Find and solve the cause (especially moisture)
- Stabilise and smooth the surface
- Prime correctly
- Repaint with the right product for the location
- Improve conditions (ventilation, sealing, maintenance)
Step 1: Remove all loose or failing paint
Don’t stop at the obvious flap. Peeling often extends beyond the visible edge.
• Scrape back until you reach firmly bonded paint
• Use a broad scraper and keep the edge flat to avoid gouging
• If the failure is widespread, scraping can reveal that you need a more comprehensive approach
Tip: If the boundary between sound and unsound paint isn’t clear, lightly score the surface with a blade in a crosshatch and use masking tape to see if there are more lifts. If it does, keep removing.
Step 2: Sand and feather the edges
Peeling leaves ridges. If you don’t feather the edges, the repair will telegraph through the finish.
• Sand the edge of the sound paint to a smooth taper
• De-gloss any glossy areas so new coatings can bond
• Vacuum dust thoroughly (dust is a bond breaker)
Step 3: Clean the surface (yes, even indoors)
Cleaning is often skipped, and often the reason it fails again.
• Wash with a suitable cleaner (especially kitchens/bathrooms)
• Rinse or wipe down as needed
• Let it dry fully before priming
If the area has mould or mildew staining, address that first and make sure the underlying moisture/ventilation issue is resolved.
Step 4: Deal with moisture before you paint
If there’s an active leak, dampness, or condensation problem, paint is not your next step.
Common fixes before repainting might include:
• Repairing roof leaks, gutters, flashing
• Replacing failed bathroom silicone/grout
• Improving exhaust fan performance or run-time
• Using a dehumidifier short-term to dry out a space
• Improving airflow in closed rooms
If you need a second set of eyes to confirm whether you’re dealing with moisture, compatibility, or prep failure, getting help fixing peeling paint can save you from repainting the same wall twice.
Step 5: Patch and smooth (only after the surface is stable)
Once the surface is clean, dry, and sound:
• Fill scraped areas with a quality patching compound
• Sand smooth when dry
• Remove all dust again
If the wall is powdery/chalky, stabilise first with the correct sealer rather than burying it under filler.
Step 6: Prime correctly (this is where longevity is decided)
Primers aren’t optional when you have:
• Bare plaster or new patches
• Chalky/powdery surfaces
• Stained areas from water
• Glossy existing paint
• A history of peeling (adhesion concerns)
The “right primer” depends on the cause: bonding primers for glossy substrates, sealers for porous surfaces, stain-blocking primers for water marks, and so on. The main point is: prime to the problem.
Step 7: Repaint with the right coating for the room
Bathrooms, laundries, and kitchens are not “standard wall paint” environments.
For high-moisture areas, prioritise:
• Moisture resistance
• Washability
• Mould-resistant additives (where appropriate)
• The correct sheen level for durability and cleaning
For low-traffic bedrooms and living areas, you can focus more on finish and aesthetics — but only after the surface is properly prepared.
Step 8: Prevent the comeback
Once it looks good again, keep it that way:
• Ventilate steamy rooms consistently
• Fix leaks fast (don’t wait for “next weekend”)
• Keep gutters clear before storm season
• Manage indoor humidity during winter (especially in bedrooms)
• Don’t paint over “almost dry” surfaces
If you’re unsure whether your home’s pattern of peeling suggests a deeper issue (like ongoing damp), it’s worth getting painting support for Sydney homes to avoid repeating the cycle.
Room-by-room: where Sydney homes most often peel (and why)
Bathrooms
Most common drivers: steam, poor ventilation, and the wrong paint system.
Focus on:
• Better exhaust and airflow habits
• Bathroom-appropriate coatings
• Fixing water entry points (silicone/grout)
Laundries
Hidden damp is common (behind machines, near taps, poor drainage). Peeling often appears behind appliances or on lower walls.
Focus on:
• Checking hoses and taps for slow leaks
• Allowing air movement behind machines
• Drying out the area fully before repainting
Kitchens
Grease and cooking residue can sabotage adhesion even when the wall “looks clean”.
Focus on:
• Proper degreasing before priming
• Durable, washable finishes in splash zones
Bedrooms (winter peeling/condensation)
If peeling clusters appear around windows or corners in winter, suspect condensation.
Focus on:
• Airflow routines (brief ventilation beats sealed-up rooms)
• Reducing moisture load (drying clothes indoors adds a lot)
• Heating strategies that reduce cold surface condensation
Ceilings
Ceilings peel from bathroom steam, roof leaks, or poorly sealed old surfaces.
Focus on:
• Identifying whether the source is above (roof) or below (steam)
• Fixing the source before repainting
Q&A: common peeling paint scenarios
Why is the paint peeling a few weeks after repainting?
Usually one of these:
• The surface was dusty/greasy or still chalky
• The old paint was glossy and not keyed/primed
• The wall was damp (or became damp soon after)
• Primer was skipped on bare patches
• The coating system wasn’t compatible
If it failed that quickly, assume adhesion was never established.
Can I paint over peeling paint if I sand it a bit?
If there’s any loose paint, painting over it just bonds to the loose layer — not the wall. It may look fine briefly, then peel again, often taking the fresh coat with it.
Remove all unsound paint first. Sanding alone isn’t enough if the layer is already detached.
Why does paint peel mostly in the bathroom?
Because bathrooms create the harshest combination:
• High steam
• Rapid temperature changes
• Water splashes
• Low airflow corners
If ventilation and coating choices don’t match the environment, peeling is likely.
Is peeling paint always a leak?
No. Condensation and humidity can cause peeling without a single obvious leak. That said, if stains change after rain or the plaster is soft, investigate leaks.
Why does peeling keep returning to the same spot?
Recurring spots almost always mean the cause wasn’t solved:
• Persistent condensation point (cold corner, poor airflow)
• Ongoing minor leak
• Salt/damp migrating through masonry
• Unstable/chalky substrate not properly sealed
• The repair didn’t reach stable paint edges
When you should stop DIY and investigate further
It’s smart to pause and reassess if you see:
• Repeated peeling with a damp smell or mould
• Soft or crumbling plaster
• Efflorescence (salty deposits) on masonry
• Large ceiling areas peeling (safety risk as it drops)
• Peeling linked to storms/rain events
• Very old homes where lead-based paint could be present (especially if sanding)
In these cases, the safest, longest-lasting fix is the one that addresses the underlying cause first.
Final FAQ
What’s the number one cause of peeling paint?
Adhesion failure — most commonly from moisture (steam, condensation, leaks) or poor prep (dust, grease, chalky surfaces, glossy coatings).
How do I know if moisture is the cause?
Look for staining, musty smells, mould, soft plaster, peeling that worsens after rain, or bubbling/blistering. Peeling in bathrooms and around windows in winter often points to moisture.
Do I always need primer after scraping or peeling paint?
If you’ve exposed bare plaster, patches, chalky areas, stains, or glossy old paint, primer is usually essential. The primer type should match the problem (bonding vs sealing vs stain blocking).
Can coastal Sydney air make paint peel?
Yes, coastal conditions can accelerate weathering and salt exposure on exteriors. Salt and moisture increase the risk of adhesion problems unless surfaces are cleaned properly and coated with an appropriate exterior system.
How long should I wait after fixing a leak before repainting?
Long enough for the substrate to dry thoroughly. Timing varies with ventilation, weather, and how wet the material becomes. If in doubt, don’t rush — repainting too early is a common reason peeling returns.