If you’re thinking about interior painting to freshen up your space, the paint colour is usually the fun part. The stress tends to come from everything around it: moving furniture, protecting floors, dealing with dust, and trying to live normally while it’s all happening.
The good news is that a calm, practical preparation plan makes the whole experience feel lighter and the end result look better. This guide is written for real Sydney homes and apartments (where space is tight, humidity can be a factor, and plenty of properties have a few decades under their belt). Whether you’re repainting one room or doing a whole-home refresh, the aim is the same: reduce disruption, contain mess, and set the walls up for a smooth, even finish.
The stress-free mindset: prep is the project
Most people think the project is “painting”. In reality, the project is “getting the surfaces ready so paint can do its job”.
When prep is rushed, you’re more likely to see:
• patchy texture that shows in sunlight
• paint that doesn’t bond properly (peeling or flaking later)
• rough edges along skirting boards and trims
• dust nibs and grit trapped in the finish
• uneven sheen where patched areas “flash” through
When prep is planned, everything moves faster, the mess is contained, and the finish tends to look cleaner for longer.
If you’d like a quick overview of what good prep usually includes (and why it matters for the final finish), have a look at this interior painting preparation guide.
A simple timeline that reduces panic
7–10 days before
• Choose colours and finishes (test swatches in morning and evening light)
• Make a room plan: which rooms first, and where you’ll “live” while it dries
• Check for repairs you can’t ignore (water stains, peeling paint, recurring mould)
• For apartments: check building rules, lift bookings, visitor parking, and allowable hours
2–3 days before
• Declutter surfaces and shelves
• Clean high-touch/grimy zones (kitchen splashes, switches, hallways)
• Patch holes, dents, and cracks so filler can dry fully
• Gather supplies: tape, drop sheets, filler, sandpaper, microfibre cloths
The day before
• Move furniture to the centre and cover it properly
• Remove artwork, hooks, and fragile items
• Vacuum skirting edges and window tracks (less dust in wet paint)
• Decide what gets masked vs removed (handles, plates, curtains)
The morning of
• Final dust removal after sanding/patching
• Confirm ventilation plan (especially bathrooms and laundries)
• Keep pets and kids out of the work zone
• Maintain a clear walkway from entry to work area
Room-by-room preparation: the calm order of operations
Follow this sequence in each room. It keeps things organised and avoids rework.
1) Declutter first (fastest stress reducer)
Start with anything that makes the room feel tight:
• benchtops and side tables
• loose items along walls (toys, shoes, baskets)
• fragile decor and plants
• anything stored on top of wardrobes or shelves
You don’t need an empty room, but you do need clear access to edges, corners, and skirtings.
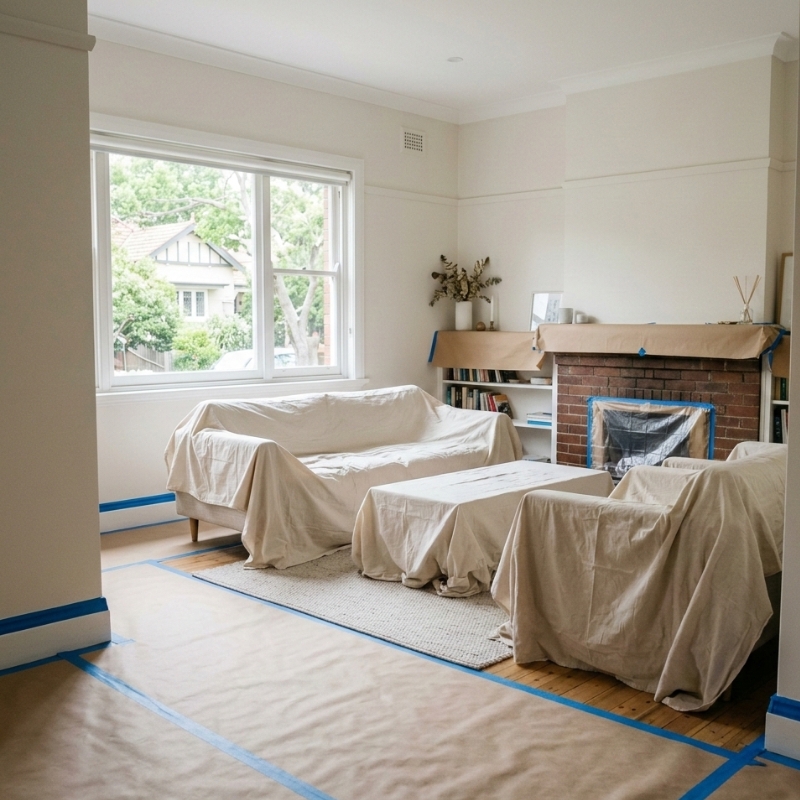
2) Make a “furniture island”
Move larger pieces to the centre, leaving 60–90 cm clearance around the perimeter. Then cover the island:
• drop sheets for drape and absorption
• plastic only where you truly need a barrier (it can be slippery)
• tape coverings to themselves where possible, not to finished floors
Apartment tip: if you can’t move much, stack and wrap (chairs on a table, boxes labelled by room) so the floor stays workable.
3) Protect floors properly (especially edges)
Floor protection is where most “painting stress” is either prevented or guaranteed.
Hard floors:
• drop sheets that stay put
• tape edges near skirting boards
• add extra coverage in hallways and doorways
Carpet:
• protective film or a secured drop sheet
• avoid loose fabric that bunches and becomes a trip hazard
Stairs:
• secure each tread, so covers don’t creep
• keep one side clear if the home is being lived in
4) Remove what’s easy so masking is minimal
Removing small items is often quicker than trying to mask perfectly:
• picture hooks (or at least remove the artwork and label hook positions)
• removable shelves and brackets
• vents/covers that will look messy if painted around
• curtain rods where practical
• door stops and small fittings that collect paint ridges
5) Clean only where it matters
Not every wall needs a full wash. Focus on:
• kitchens (oils and airborne grease)
• around switches, handles, and kids’ handprints
• near windows (dust and grime)
• behind beds and sofas (built-up lint and skin oils)
A mild sugar soap wash is common. The key is rinse + dry:
• wipe with solution
• wipe again with clean water
• Let surfaces dry properly before painting
Q&A: Do I really need to wash walls before painting?
If the wall has grease, fingerprints, visible grime, or an oily sheen, yes. Paint bonds to whatever is on the surface—so if the surface is dirty, adhesion and sheen consistency can suffer. If walls are clean and in good condition, a dust-down may be enough.
Repairs that matter: patch, sand, and seal
Patch first
Patch anything that will show once the wall is one solid colour:
• nail/screw holes
• dents and chips (especially in hallways)
• cracks near door frames and corners
• old anchor points from shelves and TVs
Let filler dry fully. Rushing this step often creates lumpy patches and extra sanding.
Sand for smoothness and grip
Sanding helps with:
• smoothing patches so they disappear
• dulling glossy surfaces so paint can grip
• feathering peeling edges so they don’t show through
Sydney’s bright natural light (especially north-facing rooms) can highlight wall texture. A careful sand is one of the best “effort to result” steps you can do.
Dust control (so the finish stays clean)
• vacuum skirting edges, corners, and tracks
• wipe down after sanding with a slightly damp microfibre cloth
• keep doors closed to rooms you’re not working in
• avoid blasting fans directly at dusty surfaces
Q&A: Do I need primer after patching?
Often, yes. Filler and bare patches can absorb paint differently and cause “flashing” (patches showing as dull/shiny spots). A primer/sealer on patches helps the topcoat look even.
Trims and doors: small prep, big payoff
Clean edges make a room look finished.
Skirting boards and architraves
• wipe them down (they collect dust and grime)
• fill small gaps or cracks if needed
• sand rough or glossy areas
• vacuum the top lip—dust loves to sit there
Doors
• degrease around handles and push points
• lightly sand glossy finishes
• mask or remove hardware neatly
• plan drying so doors don’t stick to jambs
Q&A: What’s the easiest way to avoid messy cut-in lines?
Access + clean surfaces. If furniture is too close to the walls, you rush and wobble. Give yourself space, prep the edges, and you’ll cut in more neatly with fewer touch-ups.
Sydney-specific prep: apartments, humidity, and older homes
Apartments and strata realities
• Check allowed work hours (sanding can be noisy)
• book lifts if needed
• protect thresholds and entry paths
• keep a clear exit route at all times
Humidity and mould-prone rooms
Bathrooms, laundries, and some coastal areas need extra attention:
• address the cause of mould (ventilation, leaks, condensation)
• clean/treat affected areas appropriately
• ensure surfaces are completely dry before coating
• improve airflow during drying (exhaust fans, windows, safe ventilation)
If mould keeps returning, painting over it won’t fix it.
Older homes and lead paint awareness
Sydney has plenty of older properties. If your home is older (especially pre-1970), treat old paint disturbance carefully. Dry sanding and scraping can create dust you don’t want in your home. The NSW EPA has guidance on lead-safe maintenance and renovation here: Stay safe from lingering lead.
Q&A: How do I know if lead paint is present?
You can’t confirm by sight alone. The age of the home is a clue, but testing is the only way to know. If you suspect it, avoid creating dust, keep kids and pets away, and follow reputable lead-safety guidance before disturbing old coatings.
The “minimum viable prep” for busy households
If you need the simplest prep that still avoids chaos, do these five well:
• move furniture to the centre and cover it
• protect floors thoroughly (especially walkways and edges)
• clean greasy/high-touch zones
• patch obvious holes and dents (let it dry)
• clean dust after sanding/patching
And if you’re trying to map out the order of rooms, drying time, and how to keep life moving while work happens, this guide to planning an interior paint refresh is a helpful reference.
The day-before checklist (so nothing derails you)
• furniture pulled away and covered
• walkways protected
• hooks/art removed and stored safely
• patches dry and sanded smooth
• dust vacuumed and wiped down
• skirtings and window sills wiped
• a “quiet room” set aside for kids/pets/calls
• ventilation plan sorted (especially wet areas)
Q&A: How long does it take to prep a room properly?
A typical bedroom or living room in a lived-in home often takes a few hours of prep (more if there are lots of patches, peeling paint, or glossy surfaces). In many real-world jobs, prep time can match paint time—and that’s normal.
When it’s time to bring in a licensed professional
Some situations are better handled with experienced help:
• widespread peeling/flaking across multiple walls
• bubbling paint or ongoing stains (possible moisture issues)
• recurring mould despite cleaning and ventilation changes
• significant ceiling cracks or damage
• suspected lead paint disturbance
• high ceilings, stairwells, or areas needing specialist access
• heritage details you want protected (ornate cornices, timber features)
If you’re aiming for the least disruption possible, it can help to know what a professional workflow typically looks like—this walkthrough on preparing your home for painting explains the usual sequence and what homeowners can do to make the day run smoothly.
FAQ
Do I need to empty a room completely?
Not usually. A furniture “island” in the centre works well if floors are protected and edges are accessible.
Should I paint before or after new flooring?
Often, paint comes first to reduce the risk of drips on brand-new floors. If flooring is already installed, protect it carefully—especially edges and doorways.
What should I do with curtains and blinds?
If they’re easy to remove, take them down. If they stay, cover them and tie them back securely.
How do I prep glossy walls?
Lightly sand or degloss so the new coating can grip. Skipping this can lead to poor adhesion.
Can I paint over water stains?
Only after the underlying cause is resolved and the area is sealed appropriately can stains bleed back through.